Protecting your Azure functions using your AAD
Table of Contents
Full disclosure before you read this blog post, this will be a lightweight introduction to the capabilities of authentication for your Azure Functions provided by Microsoft, I will not go into what is going on behind the scenes, how the authentication works, this will be a “implement security 101” - the baseline of what you need to get going building protected functions!
What we’ll be protecting
The function we’ll be using in this example is just a simplified version of the default visual studio boilerplate code where I’ve stripped out http post support, just for the sake of simplicity.
[FunctionName("HelloWorld")]
public static async Task<IActionResult> Run(
    [HttpTrigger(AuthorizationLevel.Anonymous, "get", Route = null)] HttpRequest req, ILogger log) {

    string name = req.Query["name"];
    string responseMessage = string.IsNullOrEmpty(name)
        ? "Pass a name in the query string or in the request body for a personalized response."
        : $"Hello, {name}. This HTTP triggered function executed successfully.";

    return new OkObjectResult(responseMessage);
}
Why security is important
Now with the function above you might be thinking “why would I want to protect that?” - well, it’s a sample, nothing more.
But from time to time I find myself building functions that are connected to databases containing sensitive information, or elevating user permissions, like getting access to specific parts of the datasets that the user does not normally have access to, or maybe you just want to make sure the user calling your function is already authenticated.
But security is hard!
Well yes and no, coding security is generally considered to be tough, but thankfully Microsoft has provided a no-code way to setup authentication, it’s actually all done through the Azure Portal (or better yet through your terminal)
Setting it up
Currently my function works like this
GET | https://yourazurefunctiontosecure.azurewebsites.net/api/HelloWorld?name=Dan
200 OK | Hello, Dan. This HTTP triggered function executed successfully.
Now to add authentication we’ll open up our function the Azure portal, head to the authentication tab, and press the “Add an identity provider” button.
You’ll be asked to select your identity provider, here we’ll select “Microsoft”, a bunch of options will appear that can be overwhelming.
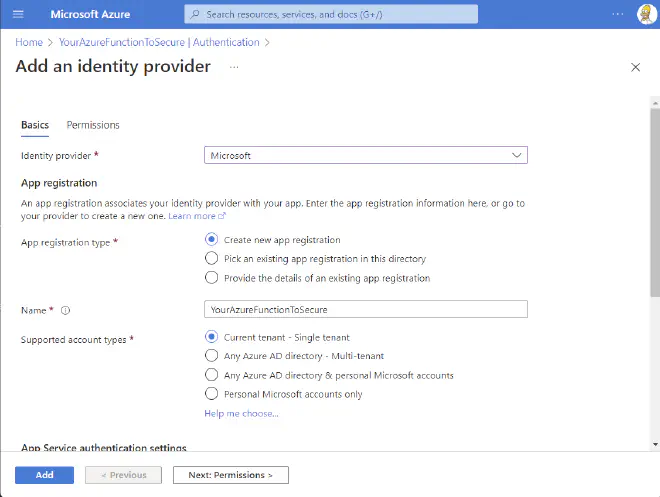
Now there are two options we want to change in the particular case, the rest are great in their default configuration for our purposes.
| Option | Value |
|---|---|
| Name | An app registration will be created, this will be the name of said registration, I generally add something like ’ - Identity provider’ at the end |
| Unauthenticated requests | HTTP 401 Unauthorized: recommended for APIs |
Press Add
Calling your function now should result in an
HTTP 401 | You do not have permission to view this directory or page.
Awesome, that’s it, now we’re done, your function is secure and no one can call it, perfect! … jk - let’s look at how we can call it.
Calling your function from SPFx
So firstly you’ll need to get API permissions for your SPFx solutions, if you haven’t done this before this is done by updating your ‘package-solution.json’ and adding the webApiPermissionRequests section:
...
    "webApiPermissionRequests": [
      {
        "resource": "YourAzureFunctionToSecure - Identity provider", //This is the name of the app registration that was created automatically in the previous step
        "scope": "user_impersonation"
      }
    ]
...
Now the next time you deploy your SPFx solution (to the modern app catalog) you’ll be prompted to approve these permissions - you’ll need an admin account.
Unfortunately this still isn’t enough, but Microsoft has done a really good job at making it easy for us to authenticate from SPFx, with your component context (WebPartContext, or alike) -
import { AadHttpClient } from "@microsoft/sp-http";
...
...
  const client = await context.aadHttpClientFactory.getClient(CLIENT_ID);
...
  const URL = "https://yourazurefunctiontosecure.azurewebsites.net/api/HelloWorld?Name=Dan";
  const response = await client.get(URL, AadHttpClient.configurations.v1);
...
Now the CLIENT_ID parameter here is the client id of the corresponding app registration that you’ve requested permissions from above, it’ll be listed under the Authentication tab on your function.
The rest should look pretty familiar to you if you’ve ever call the SharePoint REST API from SPFx without using libraries like PnPjs.
And there you go - you’re off to the races!
Calling your function from another application using OAuth 2.0
We’ll be using Postman in this example, but it should be essentially the same procedure to do it from C# using the ConfidentialClientApplicationBuilder, or whatever language you’re using
Now, when using SPFx as in the sample above, there’s a user present, but when using OAuth from “the outside” we won’t have that privilege.
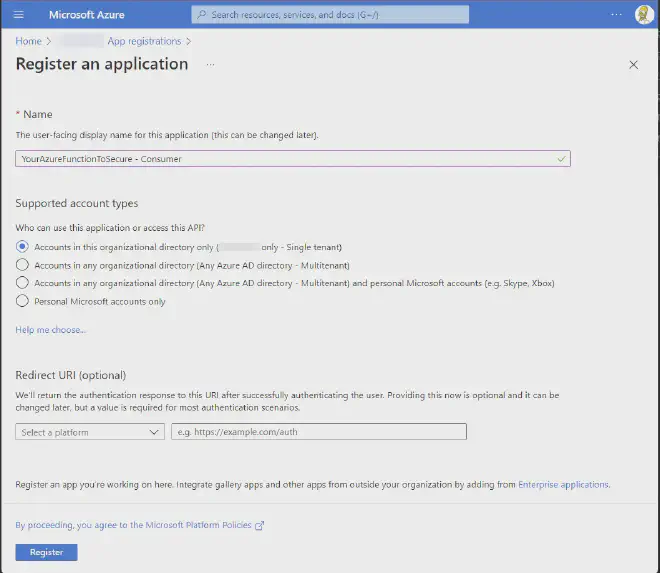
So in order to setup authentication from elsewhere, the first thing we’ll setup is a “consumer” app registration, simply create an app registration and name it whatever makes sense to you.
AAD -> App Registrations -> New registration
Once that’s done we’ll need to grant our app registration permissions to call our function, this is done by going under your app registration going to
API permissions -> Add a permission -> My APIs -> Select your identity provider -> user_impersonation -> Add permissions

Now go ahead and click Grant admin consent for {your tenant name}
Now the next step is to go to Certificates & secrets and depending on your authentication needs add a secret or a certificate.
For this test purpose I’ll use a secret, I would recommend certificates in actual production environments.
That’s all, now you’re ready to call your function again!
Let’s test is out from Postman:
Postman config - grab these value from the overview of our two app registrations
| Setting | Value |
|---|---|
| Access Token URL | https://login.microsoftonline.com/{{Tenant ID}}/oauth2/v2.0/token |
| Client ID | {{Client Id of our consumer app registration}} |
| Client Secret | {{The secret you generated}} |
| Scope | {{Client ID of your identity provider}}/.default |
| Client Authentication | Send client credentials in body |

See who’s calling (C#)
Now you might want to know who’s calling your function, this can be achieved pretty simply by adding a ClaimsPrincipal parameter to your function, the following snippet should give you an idea of how to look for the callers identity
[FunctionName("Me")]
public static async Task<IActionResult> Run(
    [HttpTrigger(AuthorizationLevel.Anonymous, "get", Route = null)] HttpRequest req, ILogger log, ClaimsPrincipal claims) {

          ...

          Dictionary<string, string> claims = new Dictionary<string, string>();
          foreach (Claim claim in Principal.Claims) {
              log.LogInformation("CLAIM TYPE: " + claim.Type + "; CLAIM VALUE: " + claim.Value);
              claims.Add(claim.Type, claim.Value);
          }

        ....

        return new OkObjectResult(claims);
    }
For users calling from SPFx I generally go for one of the following properties (sometimes one is null and another is not, i.e if the user doesn’t have an mailbox or something like that)
- http://schemas.xmlsoap.org/ws/2005/05/identity/claims/emailaddress
- http://schemas.xmlsoap.org/ws/2005/05/identity/claims/upn
- preferred_username
You also always for the object id, what should work across both App registrations and Users, depending on your needs
TL;DR
Adding authentication to your function is far easier than you might think, and there really isn’t any excuse not to do so.
And do it NOW, before it’s too late!
If you had any issues following this guide feel free to reach out to me over on twitter and I’ll be happy to help.
All functions, and app registrations used in this example have been deleted, you can’t test with them